Many people have been asking my about brewing kombucha at home ever since I started posting part of the process on my instagram stories. Hence, I have decided to share more about making kombucha at home.

So what is kombucha?
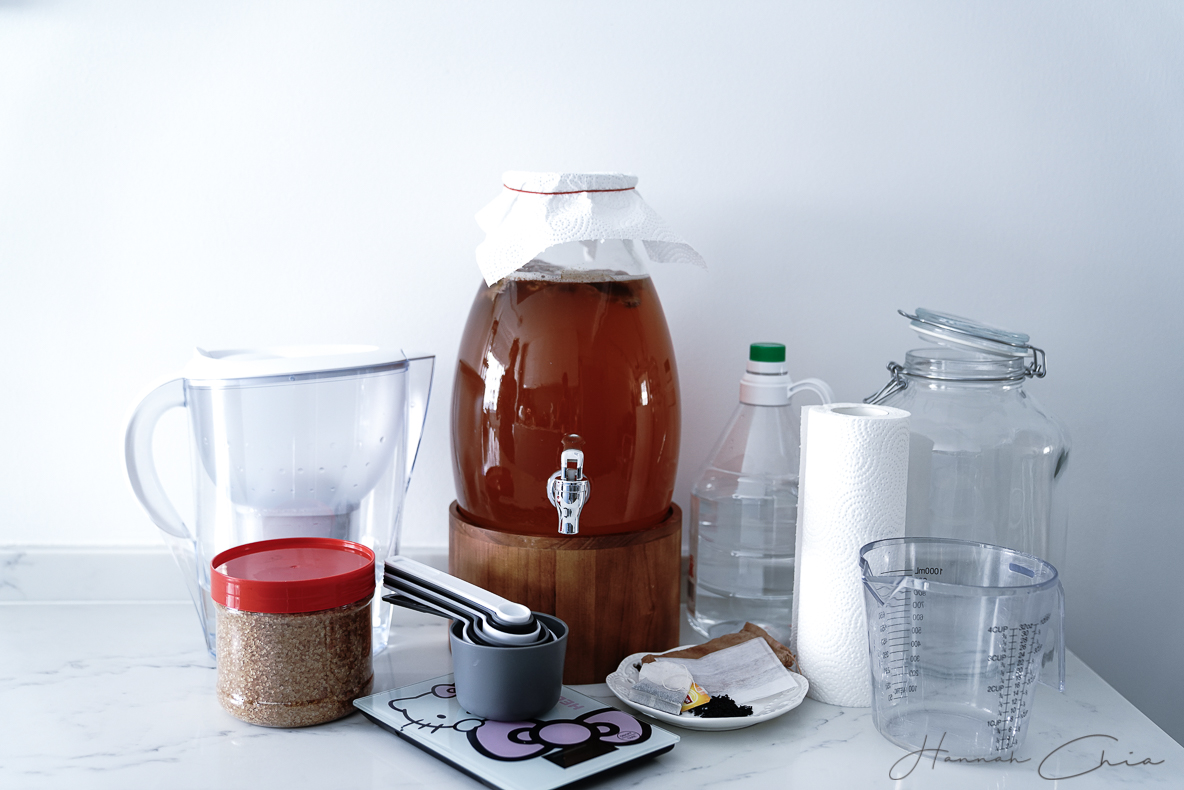
Kombucha in short is fermented tea and one can either brew kombucha from black tea or green tea depending on the scoby that you are getting. Besides getting a good dose of natural probiotics in kombucha, it is believed that drinking kombucha can improve digestion, gut health as well as to strengthen the immune system. To start the brewing process, one needed cane sugar as well as some tea. You can either make the tea from tea bags (4 to 6) or loose tea leaves (2 tablespoon).

Another important item to get before you start brewing kombucha is to get a water filter flask as the chlorine that exists in our tap water could kill the good bacteria that is need for the fermentation of the kombucha.

Oh yes, do remember to use purified water to make the tea too. After you are done brewing the tea for the kombucha, pour in the cane sugar (3/4 to 1 cup; 150 to 200g) to make it into a sweet tea which acts as the base of the kombucha brewing process.

You can also prepare the glass jar by spraying white vinegar on the inner side of the jar to ensure an appropriately acidic environment. Remember to let the sweet tea mixture cool down to room temperature before you add it into the glass jar with the 4 quarts (est 3.75 litres) of purified/ filtered water.
Then you can pour in the scoby (aka Kombucha Tea Starter Culture) together with the tea starter. This is an important step as the scoby is a living colony of bacteria and yeast so make sure that the mixture is completely cooled down before you add in the scoby. If not, you might risk killing the scoby and contaminated the kombucha. Then you have to throw away everything away as the contaminated kombucha might cause more harm than good.. =(

Once this done, you can proceed to the final step whereby you cover the glass jar with a paper towel (I am more kiasu, I layered 3 kitchen towels instead) or a tight weaved cloth and a rubber band. Do remember to keep the glass jar in a cool and dry place and sit undisturbed out of direct sunlight for 3 days or more. The longer the kombucha ferments, the less sweet and more vinegary it will taste. You can start tasting it from the 3rd day onwards. If you like the level of acidity in the kombucha, you can then bottle them into glass bottles and flavour them according to your preference. Usually, I will make sure that the kombucha has a balance of sweetness and acidity before I bottled them for 2nd fermentation as I preferred something not too tangy. For 2nd fermentation, I will usually leave the bottled kombucha outside for another 1 to 2 days before I keep them in the fridge. Some of my personal experience were lavender, ginger and even ginseng taste really good while floral kombucha such as osmanthus and rose are quite an acquired taste. Fruity kombucha like apple ones will taste like 苹果水 aka apple zapple and golden kiwi tends to give it a tangy taste with a hint of Pineapple note.
Oh yes, do remember to retain the SCOBY as well as enough kombucha to use as starter tea for the next batch. More than often, people tends to forget about this startet tea which is super important ok. So leave at least 10% of the total volumn of your next brew. When the scoby started growing way too thick, you can also considered ‘parking’ them in a scoby hotel or give it to anyone who is interested in starting their first brew. For more information, you can also join facebook group with focus on fermentation. Happy gut health everyone.


